 .
.

The Restoration
On deck to be done:
Carb rebuild
Install spring bushings I got for Christmas!!
Swap in a better steering gear
Paint it (unfortunately, not too soon)
.
Events below are in reverse chronological order, FYI.
2/6/98:More bushings. Time to put the rear bushings on in anticipation of getting the motor running again. I still need to put the bushings into the fixed end of the springs on the front. I started on the passenger rear, and there was no rubber left to the bushing in the spring eye. The inner sleeve was in two pieces, but the outer sleeve was firmly rooted in the spring eye. It was mostly worn through at the top so I used a flat blade screwdriver to slice it lengthwise and let me collapse it in and punch it out. The top mount was more stubborn and actually had some rubber left in it. The inner sleeve came right out, but the outer was a pain again. The socket on a bolt trick didn't make an impression on it. More pounding and it was out just fine. I shaved the ne bushings down just a bit and this solved the problem of the shoulder not contacting the spring. The fixed mount end was a major pain. The nut came off the mounting bolt fine, but the bolt was acting like it was welded to the spring perch. I sawed off the bolt head but it still wouldn't budge. Pounding with a punch didn't help, either. I put the nut back on and managed to make it pull out a little until I ran out of threads on the bolt. I took another bolt of the same width and finally managed to pound the offending piece out. The inner sleeve and bolt had rusted together over the years. I had to burn the rubber portion of the original bushing until the inner sleeve was able to be freed. The outer sleeve was in perfect, albeit rusted tight, condition. Much more pounding and I'm able to extract it. Of course, in all my pounding, I may have bent in the sides of the perch, beacuse the shoulder wouldn't slide in and had to be sanded down just a tad. The mounting bolts I bought didn't take into consideration that the shackles are thicker than the perch, so I need to exchange four of the bolts for units that are 1/2" shorter. Then I can look forward to repeating the process on the driver's rear and the front fixed spring ends. Joy.
2/1/98:Carb cleaning. The carb is on the bench, and has been sprayed out with cleaner and the body polished with elbow grease. In cleaning it, I noticed a few indentations that were filled with old dirt. Cleaning the dirt away revealed recessed adjusting screws, one of which I was able to loosen and remove. This one is for a passage that exits into the carb throat next to the accel pump jet. Of the other two, I was able to get the smaller one near the base of the carb to unscrew nearly a turn before the slot in the screw disintegrated. The larger screw just to the right of this one was too far gone to even get a good grip with the blade of the screwdriver. At least I've got one more thing to fiddle with when fine tuning the carb now, although I'd have enjoyed knowing all three were available. No mention of these screws are made in the parts manual, though. I've been trying to find a rebuild kit for this carb (stamped '3993' on the fuel bowl just above the IH number), and all the parts stores told me that they were on backorder from the factory. An email to Holley supports their claims. Holley did give me the number to a place called Daytona Parts Company @ 904 427-7108. They were able to sell me a kit (which requires a special accell pump they have to build) for $45 + $3.20 for 3-day shipping. I should have in by Tuesday.
1/28/98:More shackle. Following some tips from others, I tried the method of installing one side of the bushing first with the sleeve inside it, then pushing the other side onto it. This netted about the same result as last time, but I went ahead and bolted everything together anyway in hopes that under normal use, they'll go ahead and fullly seat themselves.
1/22/98:Stumbles? When I hopped in the rig to run to the store, it really wanted to die on me when I mashed the throttle to merge into traffic. It seems whenever a load is placed on it, the carb wants to spit/ backfire through the air cleaner. I had changed the jet to the next smallest size in hopes of getting a tad better gas mileage, but I've been told that may have made things too lean since the weather is now much colder.
1/09/98:Spring bushings. Time to install the Christmas gift of spring bushings. The old rubber ones were no trouble to get out, as they didn't have the metal outer sleeve that needed to be pressed out of the spring eye. And, they were a two-piece style, so I just plucked them out as there was also no inner sleeve. It's no wonder they were as worn as they are. Putting the poly bushings in proved to be a little harder than I'd envisioned. Without the inner sleeve installed, each side of the bushing could be inserted until the bushing shoulder contacted the spring eye. When the inner sleeve was inserted (hammered or 'pulled' in with a long bolt), the bushing on the opposite side would walk out about 1/8". I sanded down the outside diameter of the bushing, and the ID of the spring eye, and lopped off a tad from the end of each bushing, then chamfered the inner edges. This helped some, but not completely. After hearing from others on the matter, I just re-installed the shackle in hopes that they'll seat fully as they get used. All this and only the front bushings of the passenger shackle are done.
12/26/98:Pump cam works. After letting the epoxy harden, then I wrapped the arm with some 'glass cloth soaked in resin, then worked out all the air (I'm glad I learned to fix fiberglass when I started surfing!) After curing, the repair seems bulletproof. I'm still going to fab a spare to keep with me just in case.
12/22/98:Accel pump cam. I went out to start the engine to keep the battery charged and oil circulated, and I had a devil of a time trying to keep it running. Mashing the gas caused it to die instantly. After a few minutes, I remembered that's just what it did when I put the engine in and found the cam lever had broken. The local carb shop couldn't get one (discontinued part), and Holley said it was obsolete. I used 2-part epoxy to set the arm in its original position. After a few days of hardening, I cut some fiberglass cloth and resined it around the shaft, making sure I had plenty of contact with the cam itself. A couple more days of setting up/hardening (cold temps around here), and it seems pretty solid. I'm going to use the old broken cam that was on the 196 to make a backup I can throw in the glove box. I've got some 1/16th fiberglass plate from the R/C car days and I'll make a sandwich of two pieces for the arm so I can slide them along the same axis to increase or decrease the throw of the arm to give more or less cam action at a given point.
11/22/98:Gas leak fixed? I've noticed that when I was doing the wiper swap, there was a strong smell of gas after shutting off the motor. I looked at the base of the carb, and it appears that gas is seeping through the gaskets I have between the carb and intake. I took out the paper-core version and have yet to road test it. SO far, it doesn't do the same thing yet. Of course, it leaked when I didn't have the vacuum hose to the wiper motor plugged. Another interesting tidbit is that the motor ran smoother with the line unplugged as opposed to me putting my finger on the end to block it off.
11/11/98:Wiper motor. The driver's side wiper has steadily been wiping slower and slower, so I rebuilt the last ramaining motor I had and put it in in place of the original. I now have two wipers that work great! They're very easy to rebuild, too!
11/16/98:Another problem solved. The brake light went out when I jiggled the connection at the brake block and the firewall connector, so there was no need to dig any deeper (although the fluid in the master cylinder was full). I also found why the oil seemed to be seeping all over the place. I put a PCV valve inline fromt he vent on the valve cover to the air cleaner, and that coupled with the flame arrestor caused too much restriction for some reason. A few days of driving will tell me if I've nailed that problem, too. The Pertronix ignition seems to give the engine a wider power band, but I still get a little backfire through the carb when it's cold and I stomp on it. :( I should have the Accell coil in the next day to see if that helps.
11/13/98:I go out to warm up the truck for the drive into work and I notice that the Brake light is now lit! It wasn't lit yesterday when I gave it a test start, either. I shut it down until I can take a look at it this afternoon. :-(
11/9/98:New goodies. With all the talk on the IHC Digest about the Pertronix Ignitor system #1481 for the 196 engine from Northern Auto Parts . It took me a while to figure out how to get the magnets out of the small ring that slips over the distributor cam. It turns out that you can use a knife blade at the seam just above the raised outside ring to remove the top cover from the unit. The magnets inside are highly willing to relocate to join their neighbors, too. After bumping the starter over until the rotor was pointing at the #1 ternimal of the cap, I slipped the ring onto the distributor cam and lined up where to put the first magnet in. Then, just skip every other hole and put a magnet for the other cylinders. When I first carnked it, I was only getting a spark from the 2 and 3 plugs. Lots of playing with the air gap and switching the 70's coil for the original from the '68 152 didn't help. On a whim, I rotated the magnet ring 90 degress clockwise, and now the other cylinders fired, while the 2 and 3 didn't. I took the top off the magnet ring several more times to re-orient the magnets on the problem cylinders so that a different side was facing out. I finally hit on a winning combination and all four fired normally. I timed it at 4 BTDC as a starting point and after a short drive, it feels stronger and is less prone to lugging through a corner in the wrong gear. (yeah, yeah, a highly scientific test, I know). I've got a friend getting me an Accel SuperStock coil to complete the transformation. Hopefully, my mileage will improve greatly, as I was averaging around 15 on the way to Hatteras if I kept my foot out of it.
10/19/98:Spare tire rack. Well, the Previous Owner must have backed into something along the way, and tweaked the spare tire carrier a bit. It's been one of those things that's bugged me for a long time, so I finally took it off so I could straighten it and repaint it to a non-rust color. I just need to find something to ease the main hoop back to the way it must have been. The hardware for the latch was very worn and I can now see why it rattled so much. A little hollow rod and some new bolts should help it.
09/19/98:Little stuff. I took the truck to Hatteras for a few days and had only minor problems. One, My Ammeter showed a regular charge, but the inside glass of the guage showed condensation like it did when I was having the over-charge condition a while back. I wiggled the sense wire on the alternator and all is well again. Also, when making a turn, sometimes I'd hear a clunk. I thought it might be a loose wheel bearing or a leaf spring as had been discussed on the IHC Digest. Further investigation revealed that it was due to the broken tailpipe hangar letting the free-swinging muffler knock into the frame. A $4 hangar at NAPA fixed it like it had been before.
08/31/98:Oil drops. On the back of the Scout, I notice where oil flew onto the tailgate, etc from the suction effect while going down the road. I guess I overfilled it just a tad, and I also noticed that oil was bubbling out the dipstick cap that I had re-welded back onto the stick. The engine compartment was cleaned up from the little splatters. I then found that the rattle is due to the clutch linkage having some less-than-tight tolerances between the clevis and pin in a couple of places. I put a spring on the lever that goes through the bellhousing and that seems to have taken care of it. I piled some solder around the hold in the dipstick cap, but I don't think I got it clean enough for a good repair.
08/29/98:No news was good news. Being the glutton for stress that I seem to be, I decided to take the Scout down to the Outer Banks for a trial run on the sands. On the way down all seemed fine (except for an intermittent rattling from the clutch area) until I hit Rodanthe and heard a dragging metal sound after a bump. Pulled over and the muffler wasn't attached to the header pipe any more. I got it connected again after a short coold down and found the real cause was that a nut came off the bolt that joins the header and the pipe, allowing for play at the first muffler clamp. Once on the sands, all was well. On the way home, the rattle came and went with more regularity. By the time I got home, I noticed that it went away with clutch pedal pressure and that when the engine caused the truck to vibrate, the sound came around. I parked it until I could get light on it.
08/19/98:Top seams. It must be 'that' time of life for the threads on the truck. The soft top had threads pull out when I removed the support that suns from the windshield to the middle support bow. On each side! More needle/thread and they'll hold until I can get a place to run a real seam back into it with heavy duty thread.
08/18/98:Visor repair. Old age has attacked the sun visors and the threads have begun to rip out. A needle, some thread, and an hour later, I've got visors that are sealed once again.
08/17/98:It happened again, so I took the original
Voltage regulator out and put in the one from the '70. WOW!
It actually shows a steady decrease in charge after I start
instead of the jittery action it used to have. Also, when
running at speed, the needle stays right at the middle mark
and doesn't bounce around. On deceleration, it acts just as
smooth as I'd thought it was supposed to act. It looks like
I may have figured this one out finally! 08/15/98:No such luck. Well, on the way home from
showing the truck to my auto parts source, Kevin, the ammeter
pegged out once again. After more adjustment of the belt, it
showed no change, so I tapped on the regulator with the handle
of the screwdriver and the charge went normal again. Hmmmmm....
08/13/98:Alternator again. Before, I'd mentioned
that the alternator would sometimes sit on full charge if
there were any revs on the motor. Leaving a v-ball match
yesterday, the belt started squealing, and the guage pegged.
I tightened the belt and the guage acted normally. Same thing
happened today without the squeal. Tightened the belt again
and all is normal. That could have been the problem all along
before when I had this happen. I also note that the crank
pulley on the 196 is a larger diameter, and is spinning the
alternator faster, and maybe that's why my guage doesn't look
like it's as jittery as it had been before (at normal
operating speeds).
08/11/98:Legal! I took it to an inspection station
that actually had time to see me, and after a quick trip home
to tighten the muffler clamps and to get the reciepts for
all the brake parts, I got the state sticker applied! Time
to start road testing it to work this week.
08/08/98:Window stuff. I'd had trouble getting the
screw out of the passenger vent window so that I could put a
new piece of plastic slider material on the front of the
window. I'd gotten it loose, but it was still stubborn and
getting chewed up buy the channel locks. I got smart and
finally put a pipe wrench on the screw head and it came out
perfectly (albeit chewed mightily). I replaced the plastic
with a piece I'd gotten from Scot Satterlund and the window
now rolls up and down easily like the driver's side. I
did find out why the front of the window sits lower than the
rear: the regulator inside the door has rotated on its
mount and isn't locating the front window guide high enough.
I may take a look at the 70 to see if it's got a regulator in
a little better shape.
08/07/98:The clutch seems to be working fine, so I
bolted the flywheel cover back into place. There's a smear
of oil that looks like it's weeping from the back end of the
oil pan gasket, but it's not enough to worry about.
08/06/98:Wiper done. I cleaned up the motor from the
'70 and am using it in place of the '68's. before, the passenger
wiper was faster than the drivers, now this one is even faster
than before. I think I need to clean and relube the driver's side
motor to bring up the sweep speed a little, but that can be saved
for another day entirely.
08/04/98:Tidbits. I pulled the passenger wiper motor
from the '70 yesterday, and took it apart today. What a simple
but effective unit. I pulled the non-working one from the '68
today and after taking the top off of it, I saw a bunch of
white sludge caked all around. I have no idea what turned the
grease into this, but it pulled a bit of the cork off the
side of the internal flap, so I'll piece together the '70's
motor with the '68's to get a working unit. I also fabricated
a little 'U' to help cover most of the hole in the firewall, and
I'll Marine Tex the gaps tomorrow.
08/01/98:It Moves!! I finally found a combination
that allows the clutch to work 'properly' while not having the
throwout bearing constantly riding on the clutch fingers. The
large linkage that runs parallel to the firewall had a hole
already drilled in it about two inches lower than the top hole,
so I sawed down on the bulkhead that the master-cylinder attaches
to (where the threaded rod from the clutch pedal passes through).
Once I had two lines cut on either side of there the clevis attaches
to that rod, I bent the metal don and back into the cab area.
Reconnected all the clevis pins and after a little more adjusting,
had everything in a working order. I had to keep the .080" washers
between the pressure plate and the flywheel to give me the clearance,
and after a few more visual checks, I took it around the block for its
'maiden' voyage. I noticed that the oil pressure ran more normal at idle
after this test run, which also made me a little more comfortable.
As I was giving it its pre-inspection inspection, the passenger wiper
didn't want to work. As soon as I can fix this and put some
fiberglass on the hole in the firewall, I'll be ready for the real
state inspection. It's so close, it almost hurts...
07/29/98:More Clutch woes. I've done a bit of
cutting and grinding and filing to get the firewall clearance
for the clutch linkage, but now I can't seem to get the
throwout bearing to fully engage the clutch fingers (without
having it ride on the fingers the whole time). I may need to
drill a hole (in the link that the threaded rod from the pedal)
a little lower than the present one so that the pdeal produces
more 'throw' than it is right now. I'm going to try what
someone on the digest mentioned regarding putting some .080"
washers between the pressure plate mounts and the flywheel first.
07/28/98:Clutch woes. Of course, I'm beside myself
trying to get the thing rolling under its own power, but the
clutch linkage is taking forever to get right. I'll need to buy
another piece of grade 8 threaded rod to make the pedal attachment
reach far enough. *sigh*
07/27/98:IT LIVES (part II)! More connections on the
electrical and a bit more re-routing of the heater hose and the
valve exiting the water neck. The throttle linkage was run and
oil was put in. Another once over to make sure I'd not forgotten
anything and I poured some gas into the carb throat. A few cranks,
and it was fired (for a moment). I had forgotten to seal the vacuum
that runs the wipers from the fuel pump, and the vacuum advance on
the carb. attached the proper hoses and all was purring smoothly.
I had an oil pressure reading of 20 psi at idle and 50 at higher RPMs
(I just wish my guage would reflect the change in pressure on the dash).
All that needs to be done now (I'm jinxing myself with that line) is to
cut the firewall for the clutch linkage and I can get it inspected!
07/26/98:Back from vacation. I put the carb
on and hooked up the fuel lines. I also ran the vacuum lines
so that the routing was out of the way and looked more neat
in the engine bay. The '68's radiator and the shroud from
the '70 went into place and the assorted water hoses were
reattached. The alternator went on, but the 196 belt was
a tad longer than the one I'd purchased for the 152. New belt,
no problem. I hooked up most of the wiring before the darkness
set in and the mosquitoes came out in force.
07/18/98:The engine is in! It took a lot longer
than I'd anticipated, though. The 196 was ready except for
mounting the pressure plate and clutch disk on the flywheel,
and also putting the 152's motor mounts on it (the '70 used a
mount that sat flat against a thick rubber oval mount, the
'68 uses a mount that is angled at about 60 degrees and has
a rectangular urethane mount. Pulling the old engine out
meant having to brace the tranny/xfer case with a jack, and
disconnecting the front driveshaft. We rolled the tranny back
enough to clear the bellhousing and started using the equalizer
bar to lift the nose of the engine. Once it was out, I went to
work on the clutch and my friend Chuck worked on the motor
mounts. All was ready shortly thereafter, and we began dropping
in the 196. This is where we spent a lot of time. We tried to
shorten the chains going through the equalizer bar before we
started and this was causing the bar to catch on the cowling at
the back of the engine compartment. We propped up the engine one
end at a time and removed the equalizer bar altogether since we
didn't need to do any more angling of the engine itself. Once we
got it seated on the mounts, then the task of putting the tranny
to the bellhousing presented itself. We really could have used a
true tranny jack, because we had another incident of Chuck's head
almost getting in the way of an unstable tranny/x-fer case. After
that drama had been solved, the tranny mated to the bellhousing and
the crossmember and tranny mount bolts were tightened to spec. By
this time, nearly 5 hours had passed and I needed to get the hoist
back to its owner so I could get Chuck on his way home. I kept
putting on parts like the starter, exhaust manifold, water pump,
and the clutch linkage. Of course, the 196 linkage is different,
so it hits the firewall before it engages at all, so I've got to
make a few incisions to clearance it, and then make the hold look
like it was designed to be there. It's definitely not going to
make to to the beach for my vacation. :-(
07/16/98:Just about there. More connections were
made, including the crankcase vents and fuel pump to intake
connection. I tapped the rear main seal into place and
bolted on the clutch mount/coil mount onto the intake
manifold. I couldn't remember how the rod went so I had to
consult a pic. I think all the vent tubing will clear the
clutch stuff with no problems. Once that's done, it's ready
for tomorrow morning.
07/15/98: Bolting on more parts. The fuel pump was
attached and I discovered that the carb from the 152 had a
different bolt pattern that would not go onto the 196 intake.
I cleaned the old carb and put it on. The new valve I got
that sticks out of the water neck now interfered with the
throttle linkage, so I had to clearance the valve body by
using the Dremel tool a tad. I think I've got it so that I
can get both full throttle and not have it stick wide open.
I got a couple of 90 degree elbows for routing the crankcase
venting tubes from the intake, so that it will look a little
cleaner than original. I got the rear mail seal out using a
flat-blade screwdriver. Just stick it in and slap it down.
The seal will deform, so move the driver to another spot and
repeat. DOn't worry about destroying the seal, only worry
about scoring the crank itself as you insert the blade under
the seal. I'll put the seal in tomorrow and put the flywheel
on.
07/14/98: I did a little more work getting the truck
ready to accept the engine. I unbolted the exhaust manifold and
got a few of the rust spots off before spraying it again with the
BBQ paint. I put the battery tray in from the '70, so I'll have
a secure mount unstead of the plank of wood being used before. I
used a punch to pin-punch around the shaft that the clutch fork
attaches to. There was a little play at the ends, and that cinched
the tolerances up perfectly. I think that was the cause for the
rattle I noticed at speed on the 152, and I'm hoping that this will
keep the rattle from returning on this one.
07/12/98:The valley pan came off and I put the lifters in
the easy way. I then used some of the Right Stuff gasket maker. It
looks like this stuff will do the job of keeping the oil in much
better than the permatex did on the 152. Once that was buttoned
back into place, I used a 3/8" drive universal joint equipped 9/16"
socket to tighten the intake bolts to the head. The rocker arm
shaft went on next (I couldn't find one that didn't have wear under
the exhaust rocker for cylinder #3). The valve cover went into
place and I called it a day.
07/11/98:Much more success. Okay, the trick is to take
a 3/8" (I believe) drill bit and twist it into the oil seal finger
about half an inch or so and then just pull it out. I knew I'd
remember how I did it eventually. I used LocTite red on the old
rod bolts since my IH dealer wanted $20/bolt and $6/nut for the parts
numbers I gave him. They were very unhelpful this time (my contact
there has left the company :-{). I buttoned the oil pan on and
had some friends help me set the engine back to horizontal. I put
on the head and the valley cover, but then realized that I'd forgotten
to put the lifters back in. Oh, well, I've always wanted one of the
lifter installer tools. :-) Once I get them in and find a 1/2" drive
9/16" universal socket, I'll put the intake manifold back on and it'll
be ready for the re-install. It's got to be ready by next week since
I'm heading to the Outer Banks for vacation! Keep your fingers crossed
for me.
07/7/98:Rear oil seal. This is being much more stubborn
than the one I did on the 152. The little seal fingers that go on
each side of the bearing cap are reluctant to come out like the
other ones did. It looks like I'll have to get a bit creative
now. I tried taking the cap off, but it requires a puller due
to the tight tolerances. The saga continues...
06/23/98:Cylinder head is back. Got it back from the
speed shop that was going through it. All systems are go and
it had hardened seats in it already (saving me a bit of cash).
It's gotten it's first coats of red paint.
06/04/98:Oil pan finished. After another hour of wire
wheeling the oil pan, it's stripped and has it's first coat of
red paint applied. I also scavenged the battery tray out of the
'70 since the '68's was a piece of wood. It's been stripped
(although heavily pitted with rust) and had it's first coat of
primer applied. I'm hoping to get some spray on Plastidip to coat
it with to prevent corrosion. I also decided to paint the
timing gear cover red instead of leaving it in its aluminum
color. Same goes for the oil filter mount.
05/28/98:I've been lazy. Well, not actually with regard
to getting stuff accomplished on the engine, but with jotting
the progress down here. In the last month, I've managed to
get the oil pan off, but couldn't get a wrench to pull the
rod caps off due to still not being mounted on the engine stand
(it's resting on 2x4's). I stood the block on the flywheel end and
now have full access to all the spots I need to get to. I pulled
the #4 rod bearing cap and the bearing is in pristine shape.
I also got all the gunk stripped from the outside of the block
and have coated it in red paint as it was originally. I'm
still debating on whether to paint the timing gear cover or
leave it in its natural aluminum color. I've gotten the
head into a machine shop and am having them go through it and
also put in hardened seats to make it lead-free-friendly.
I cleaned the old fuel pump up, and pulled the old one from
the dead engine. The one originally from my truck is in a
little better shape, so I'll use that when the time comes. I also
started removing more stuff from the dead engine to ease
dropping the 196 in when the time comes for the swap. Items
like the radiator, water pump, electrical connections/alt, carb,
and anything else besides the motor mounts have been loosened or
removed.
04/29/98:More rust removal, and I'd just gotten all
the rust dust removed from the garage a couple of months ago.
At least this time the film of dust won't be as thick. I got
the intake cleaned and the first coat of paint applied to it.
I figured I might as well just keep as much of the original
parts together as possible. I also removed the starter and
flywheel so I could start cleaning them as well.
04/27/98:I still haven't gotten any arms made for the
stand I borrowed from my friend, so I propped the block in the
back and on the pulley at front so I could get the oil pan off
so I could start to check the bearings and whatnot. Of course,
the block is sitting pretty close to the ground, so I'm not sure
if I'll be able to tell much as it sits.
04/26/98:I bought another wire-wheel assortment to do a
better job on the intake. There's still much caked on gunk to
remove before I can paint it. They did work well on the valley
cover that had been repainted baby blue (like the oil pan, too).
04/24/98:More wire wheel on the intake manifold. The part
numbers between the 152 and the 196 are different (of course). I'm
going to pull the 152's manifold and compare it, but I may just take
some rough measurements and compare it to the 196's.
04/20/98:The next item for the stripper is the intake manifold.
There are a bunch more nooks and crannies to it compared to the last three
items, but it's progressing, at least. I'm going to check the part numbers
to see if my current intake on the 152 will interchange (I think it will),
since it's already cleaned and has new freeze plugs installed.
04/19/98:The valve cover has its first coat of red paint applied and
looking good. I rebuilt the last two lifters and out of the bunch, only one
was stuck in the compressed state. I took the wire wheel to the water neck and
thermostat housing and applied the first coats of paint to them as well.
04/18/98:I started stripping the rust and crud from the valve cover.
Other than that, I scraped the part of the block under the valley cover and
rebuilt all but two of the lifters (ran out of time).
04/14/98:Gunk-o-plenty. I started cleaning the rocker arm shaft
and it fought me the whole way. The grime had built up very well inside the
stands that attach to the head. After some soaking in mineral spirits and
some banging with a wood block, the stubborn ones came off. Under the
fifth, sixth, and a little of the seventh rocker arms, the shaft had worn
and scored from the motion of the rockers. I'll need to find another shaft
before I put it back together. The bushing in the rocker arm looks fine,
though. Hopefully, someone will have a shaft they don't need that they can
send to me.
04/12/98:More teardown. I took a wire brush to the side and front of
the block now that the oily gunk is mostly gone. I'll rinse it with alcohol
before I paint it just to make sure I've gotten all the gunk off. I got the
head removed (and forgot about the coolant that was left in it until it gushed
out). I had planned on re-ringing the pistons, and there is no ridge at the
tops of the cylinders so it should be a very easy job. I'm toying with the
idea of having new valves and hardened exhaust seats put in while it's apart.
Thus, the machine shop could dip it to clean it instead of me having to do it.
Can you say 'Sludge build-up? Sure, I knew you could.'
04/11/98: Teardown time. More parts got cleaned. I've found that
carb cleaner does wonders when used with an old toothbrush to get into the
nooks and crannies. The timing gear cover is actually shining again. I got the
last stuck bolt off the exhaust manifold finally.
04/6/98:The cleanup begins. Instead of having to clean just a bunch
of rust as on the '68's motor, This one is caked with oily mud. I've let
two soakings of degreaser do it's thing and it's helpd a bit. I forgot to
get compression readings from it before I took the engine out, but I think
I'm gonna replace the rings anyway since I've got it apart like this. Once
I mount it to the stand, I'll drain the oil and check the bearings to see
if there are any gotchas before I start investing any cash into it. It's
amazing how much lighter the intake manifold seems when you don't have to hunch
over a fender to take it off!
04/4/98:Heave HO! Well, the engine is finally out of the '70. Of
course, the engine stand I borrowed from a friend didn't quite work as well
as I'd planned. The bottom two support brackets that attach to the block
weren't long enough to reach across the the bolt holes. I've got a friend
that may be able to fab soem longer versions so I can at least mount it instead
of letting it rest of a couple of 2x4's laying across the stand.
03/14/98:Yes, I'm alive. After waiting months for the weather to
give me a non-freezing Saturday, I was able to start pulling pieces off the
'68 in preparation for the engine swap. All the electrical connections are
out of the way, alternator's off, and the radiator and hoses are drained
and removed. All that remains is unbolting the tranny from the bellhousing,
and unbolting the motor mounts. I plan on taking as many pieces off the bad
engine (water pump, alternator, etc) as possible since most are still new.
Now, if I can just find a friend to let me borrow an engine hoist, I can get
this one out of the way (preferable to renting one since I can use the extra
$$ for new gaskets and the like on the 196 before it goes in).
01/10/98:Oil out. Drained the oil, and there is no hint of water in
the system, but the radiator is low on fluid for some reason. Anyway, after
draining the oil, I dropped the pan and found some tinfoil-thickness pieces
of metal about the size of a quarter, and a bunch of shavings in the bottom of
the pan, and the big pieces have that bluish, high-temp coloring to them. I
pulled the main bearing caps, and the center cap looked a little copperish in
the middle. I pulled the second and fourth bearing caps next, and the bearings
in each were galled, and the journal under the fourth had some smooth grooves
worn into it. Looks like I'll have to pull the engine anyway, now.
11/30/97:Disaster strikes again. On the annual tree run we make, I was
almost the the store we buy our tree at (~5 miles away), and the engine started
acting up again. We were in the store for a while to let things cool down (even
though the temp was normal, too). Halfway home, it started happening again. We
made it to our neighborhood and I coasted most of the way in. When I put it in
gear to turn onto my street, it died with no power. I restarted it and goosed it
so I wouldn't have to push it to my house, and it dies shortly after. I started it
the next day, and could tell it wasn't quite as it had been, but it still runs, and
doesn't leak, etc. Of course, now it's winter and I don't have an enclosed space to
work on it.
11/8/97:It starts. It runs, it doesn't smoke, no froth in the oil. I
put a mechanical oil pressure guage on it and the readings are within spec. I'm
running the guage on a "T" with the oil sender so my dash guage still works. My
dad and I took it around the neighborhood while he was over visiting and the beast
behaved. It looks like it was a temp problem.
10/25/97:Major Bummer. I took the Scout to the mountains with a group of
friends to do some camping and hiking. Made it there fine except the voltage
regulator started acting up again. And driving through Charlottesville during rush
hour made the clutch start acting up. It took to the trails well and never faltered.
The next day, I was driving home and the steering felt loose. I could wiggle the
driver's front wheel so I took the hub apart to tighten the retaining nut I'd not
gotten totally snug when I was putting it together. No bearing damage. Back on the
road 1/2 hour later. Trying to draft a rig to help the fuel mileage for 20 miles
and I felt a little power loss, then the motor started making clacking noises as I
pulled onto the shoulder. It died as I coasted. I checked and could turn the
motor using the fan belt and there was no oil leaking and no water in the oil. I
waited a few minutes and it started, but ran a little rough. No smoke from the
tailpipe, so I drove it up the onramp a few hundred yards away. When I got near
35-40 mph, it started making the sound again. I pulled into the gas station and
ran up the cellular bill tracking down my dad to get him to bring the trailer.
After the hours spent waiting, it started and ran fine when I drove it onto the
trailer. What a guy! He drove the 3 hours to get me, then dropped me at my house,
then drove home an hour away. He got an extra hour of sleep since it was daylight
savings going into effect. He'll be getting a superb Christmas gift this year!
9/15/97:Tank in. The driver's fuel tank is now back where it
belongs, and the fuel float is dry on the inside again. I sealed the float inside
a deflated balloon hoping to stave off any leaks in the float for a while. The
guage reads accurately again, and I don't smell or see any gas leaking from
the compartment. I also put in the heater core/box, but haven't hooked up
the coolant lines to it yet. At least I've got a defroster again. I finished
the sides and hood with polishing compound and a coat of wax, and the
color actually looks pretty good (especially since it's thinner in some places
compared to others).
9/14/97:Cleaned the compartment where the tank sits in the
body. After I'd gotten the traces of gas that were still around out of there,
I re-primed the surfaces then sprayed the undercoating in the hole as I'd done
before. I'm glad I'd originally coated the bottom half of the tank with the
undercoat as I could spot where the leak was occurring by looking at where
the undercoat was no longer present.
9/12/97:I used an X-acto knife to open the diameter of the hole
in the tank a smidgen. It measured about 1/16" across after I got done prepping
it. I melted some paste flux in and around the area, and let solder from my iron
weep into the gap. After it had dried, I Marine-Tex'd over it using a thin piece of
aluminum as a cover patch where the seam is createdbetween the tank side and
bottom. After it dired, I let it sit overnight with water in it and noticed no wet spots
on the floor. It looks like it sealed just fine.
9/10/97:I washed the inside of the tank with muriatic acid and
filled it with water to see if I could see exactly where the leak was. It turns
out that there's a pinhole where the original metal rusted away a bit. I may try
to make the hole a tad larger and solder it, then marine-tex over it with a metal
patch. I'd rather do that than put tank sealer on the inside.
9/07/97:Removed the driver's side fuel tank so I can figure out
where it's leaking. It looks like it's at the seam at the bottom of the tank, not the
mounts that had been welded back on.
9/05/97:Paint cleaning. I began the process of seeing how much
oxidation the paint has gotten. It looks like the polishing compound has lightened
the shade of my paint closer to its original color. Unfortunately, it'll take a new
coat of paint to get it back to the original color again. At least it looks a little better.
9/03/97:Wiper repair. On the way to Hatteras, it rained buckets,
and my passenger side wiper quit working properly much like the driver's side
did back in July. I borrowed wiper removal pliers and got both arms off and found that the
set-screws had loosened enough to let the splined nut turn free on the motor shaft. I
filed flats where the screws would locate and reinstalled the wipers. They now
work as well as they're supposed to.
8/26/97:Seat belts in. After I rounded out the phillips-head
screws used to mount the rear seat belts, I filed flats on opposite sides of
each screw head so I could get a wrench on them, then heated the nuts
underneath the cab with a propane torch and they came out easily. I should
have heated them first and they probably would have come right out. I used
the original belts that came out of the front seats, but they may be on the short
side if you've got large passengers back there.
8/22/97:Leaking water, again. This one turned out to be a
simple fix. The O-ring that goes on the water pipe from the water pump to
the cylinder head had torn and was leaking. A new ring was installed and
there are, again, no drips on the pavement.
8/16/97:Heater core ready. I've had the heater box out while I was
looking for a suitable material to use as insulation/shock absorption for the
heater core. I found that regular weatherstripping is what the A/C shop around
the corner from me uses. Everything is bolted back together and ready for me
to put back into the engine compartment.
8/11/97:Daily driving seems to suit the beast around town,
but it's really geared for off-road instead of highway cruising. I
ordered some seat belts from JC Whitney (the shortest available) and
installed them for the front passengers. I need to get the rear mounting
screws loose and then I'll put the old front belts in for the back seat.
The clutch-related noise seems to only come about when I tach the engine
up a bit in the lower gears. If I'm really gentle on it and short-shift
it, the noise doesn't seem to happen.
7/26/97:Well, it's first trip to the sands of the Outer
Banks went fairly smoothly. I took it out onto the sands of Oregon
Inlet for some surfing/fishing, and also to the ramps at Salvo and
at the Hatteras lighthouse. The ammeter did its thing again, but
I pinched the connector plug and the problem went away again. I
did notice a vibration-type sound coming from the clutch area when
the revs were higher in each gear (and from about 45mph upward).
It went away when I pressed the clutch pedal in enough to feel it
start to engage. After having to use 4-lo to get through some
really fluffy sand, the noise seems to have dissipated, only re-surfaces
very occasionally. The driver's wiper motor only wants to throw the blade
halfway through its arc after using it through some torrential rain.
Hopefully, it's just a vacuum line coming loose a bit.
7/17/97:DOH! The freshly installed tank has a
minute leak somewhere near the left-front mount hole. It's
not enough to worry about right now, but will need some attention
when I get back. Installed the rear shocks. On the way back
from the gas station, the ammeter pegged at full charge when
I started the engine. I got home but couldn't find any wires
visibly shorted. Bolted on the old alternator, same effect. Tried
a new voltage regulator, same effect, but it worked correctly some
of the time. Took off the old regulator and reset the points and
air gaps. That worked for a bit, but went back. I noticed that
when the flat connector to the regulator was tweaked with, the
charging went back to normal. I squeezed the connectors a bit
so the spade connectors on the regulator would make better contact,
and the problem went away. Next step is to replace that connector
plug.
7/16/97:Two tanks now. My friend finally got
the driver's side tank back to me after welding on new mounts
to the bottom. It'll be nice no have the extra capacity there
for when I take it to Nags Head, NC next week.
7/12/97:Back together (again). The intake
gasket hadn't come in yet, and I was jonesing to enjoy
the nice weekend, so I cleaned the old gasket and re-installed
it (using silicone around the water ports). After tightening
things down, I started it, half expecting to see coolant gushing
out. I put on the driveshaft I got from Howard Pletcher, and
it fit perfectly. The skid plate was bolted on and all hose clamps
were re-tightened. I drove it all weekend and I didn't see the leak
come back at all. I pulled the top and have been cruising around
like that for the past few days now. There is still the obligatory
few drips of oil after standing overnight, but I'll accept that
since the beast is nearly 30 years old.
7/09/97:New gasket installed. Okay, my dad
assisted me this time, and we used sealer around where the
water ports are on the block and the head to further reduce
the chance of another leak. After that, I started putting
the rest of it back together. I'm still waiting on another
intake manifold gasket, but I've got the engine back together
to the point that I'll just have to put the gasket in place and
torque down the manifold. I'll be so glad when my garage floor
doesn't have a zillion engine parts strewn about.
7/06/97:Not Again. :-( Somewhere, somehow,
I've picked up a coolant leak because there's a puddle
under the flwheel cover after I drive it. I'm thinking
the head gasket got tweaked this last time I removed the
head. I've started taking the pieces back off so I can
change the gasket again. I'm definitely getting another
person to help me with it this time.
7/03/97:Runs like a champ! No more piston
slap sound! It drives great and I'm not hesitant to
floor it when merging with traffic. There's still a little
bit of an off-idle stumble for some reason. I replaced the
gasket on the float bowl with a piece of sheet rubber (that
roll just seems to last and last) I cut to form from the old
one.
7/01/97:Back together again. Picked up a new
rod bearing for the number four rod since it was showing some
copper color in the middle of the bearing. I also noticed some
gouges on the rod journal. It looks like there was a problem
with the original rod/cap/something and that that problem
caused the crank to slam into some sharp metal. There was
no metal protruding, just gouges. The new bearing clearanced
fine with the proper torque. The rest of the pistons went in
with no drama. Got the head and rocker arm assembly back on.
Siliconed the block where the valley cover will ride since I
still couldn't find a gasket. The pistons went in beautifully
and everything was smooth sailing as it was bolted back into
one unit.
6/28/97:Honing completed. Using the
medium/fine cut stones in the hone, I put a nice crosshatch
in each of the cylinders, and cleaned the gunk from all the
holes and the crank. The new rings didn't need to be gapped,
but I had a bunch of carbon to get out of the grooves. Once
I get the rod bolts, I'll be able to start putting it back
together again.
6/23/97:Pistons out. I've decided to take out
all the pistons and put new rings on each. Good thing I pulled
them out, since the #2 piston had a broken top ring. I've also
taken a ridge reamer to the tops of each of the cylinders so the
new rings don't hang on anything. Picked up the new piston
that was having the rod pressed onto the wristpin.
6/19/97: Back to the block. With the appropriate
sockets in hand, I got the intake, lifter cover, exhaust
manifold, and cylinder head off (again, ugh). I took the
rod cap off, and shoved the piston up and out of the cylinder.
The first thing I noticed is that the skirt had been galled in
four places, each about 45 degrees on each side of the wrist
pin, with one of the spots looking exceptionally rough. The
inside micrometer showed that out of round and taper
measurements between the top and bottom of the cylinder was
within tolerances. Also, there were no major gouges inside
the cylinder, so I'll just take a stone-hone and crosshatch
the lining before I put a new piston in. The wrist pin is
pressed in instead of using a spring keeper, so a machine
shop will have to press it back in when I find a new piston.
Time to make another call to NAPA. I should have bought
stock in them before I began all this. :-) In other good news,
I recieved the new driveshaft from Howard Platcher. Putting the
old one next to the new one shows me just how bad my old one
had gotten. The unit from Howard has no slop and is only 1/4"
shorter than my present shaft, so it should work beautifully. I'll
test the fit tomorrow.
6/12/97:More engine parts off. Started taking
off the top end of the engine, but had to stop when I
couldn't find a socket to remove one of the intake
manifold bolts (it requires a swivel 9/16" socket since
the clearance around the nut head is so tight).
6/09/97:Back into the engine. Removed the
oil pan to check the clearances on the rod and
crank bearings. Nothing moved any more than it should
have, and after pulling the rod cap on the #1 cylinder,
that bearing looked to be in near perfect condition.
I eventually tugged on the skirt of that piston and
managed to make the same clacking sound I'd heard. I
did the same test to the #4 and it showed only as much
play as the #2 and 3 cylinders. Hopefully, it's only
the piston that will need replacing, and that it's not
being caused by a cylinder that's out of true.
6/07/97:Front shocks. Installed the longer-shaft
front shocks and they fit nicely. The longer rears are too long,
so I'll have to go back to the standard length and settle with less
downward travel than optimum.
6/05/97:Vacuum stuff. I replaced the
vacuum advance line with a piece of universal brake
piping 20" long. I found out that the new vacuum
advance module doesn't have a flange "seat" for the
flange on the piping, so I'll need to go buy a fitting
so I don't have a vacuum leak there. Maybe it will
run a little better then, 'cause it almost wants to die
when I give it gas right off idle. Got word that the
heater core has a couple of pinholes in addition to the
crack at the base of the nozzle. Recommendation:
re-core it. It should be ready in a couple of days.
Howard Pletcher is checking on a front driveshaft
and slipyoke (full compressed length is 24.5",
measured u-joint center to u-joint center; yoke depth
is 3-7/8").
6/01/97:Wiper Arms on. The roll pin in
the passenger side wiper arm serrated nut was as
siezed as the driver's side, so I drilled it out as
best as possible and managed to pull the nut off. The
new one was easy to install (uses set screws) and
operates flawlessly. Remember to start the motor and
let the wiper motor return to its full stop position
before you put the arm onto the nut.
5/30/97:Heater box painting. Painted the
heater box black since I couldn't find anything close to
the grey-green it had been originally painted.
5/29/97:More sending unit stuff. The guage
wasn't reading anything but full, so I popped the access
panel hiding the fuel sender and put the sender in from
the driver's side in its place. Now the Fuel guage works
close to as it should (near full = full tank, on "E" means
2 gallons left. I made a "flap" from teflon sheet to span
the distance between the access panel and the inside of
the rear quarterpanel to keep water and gunk from
being flung up inside the cavity as had happened before.
5/27/97:Heater core. Four bolts later, the
heater core/box is out. I had to remove the cap nearest
the inner fender to slide the core enough to let the input
and output nozzles clear some sheetmetal in the engine
bay. Once the box was out, the core slid out easily. The
bottom nozzle has a crack where it meets the core. I took
a wire brush to the box and fan motor, and primed them
for painting.
5/24/97:Finally! Installed the new alternator and
the mystery noise was gone. Gave the filler one last sanding
and sprayed each side with primer. Removed the front driveshaft
so my dad could lengthen it in an attempt to take out some of
the slop due to not being far enough into the slip yoke. Rolled
the sides up on the top, and headed for home. Forty-five
minutes later, my friend Chuck and I stopped for pizza/beer, and
we noticed a dip from under the area of the heater core. It ran a
little warmer than I thought it would, but I still haven't put
in a proper mix of coolant since I want to get as much of the
rust dust out of the system as possible first. At least the beast
is now sitting at home!
5/17/97:Close, but no cigar. Another round of
sanding on the body seam filler to smooth it out. Adjusted the
parking brake and the front brakes again. Re-riveted the mounts
for the top that run behind the windows (the rivets had broken).
Mounted the accelerator pedal to the floor. Washed all the dust
off it, and drove it down the road to test it. Hmmm, I dont'
remember that groaning/himmung noise from before. I parked
it and popped the hood. Nothing looking out of place, no leaks,
oil pressure nominal, temp was okay, ammeter responding. It
wasn't until I happened to touch the alternator that I figured
it out. It was scorching hot! I'll see about getting the
bearings replaced in it compared to the price of a new one.
Tweaked with the fuel sender in the tank that is installed to
get it to start reading. I'm not sure if it's shorted, but it
reads a full tank, which is what is in it. Replaced the valve
cover gasket to replace the one I made. The front driveshaft
seems very worn making for a lot of slop. It scould be inserted
into the output from the x-fer case to remove most of it, so
I'm planning on chopped some of the worn end off the splines
and getting it lengthened about an inch to make up the difference.
Maybe next weekend will have a better outcome
5/13/97:It's LEGAL!! After one more once-over, I
took it to an inspection station and after a scary moment when
the guy checked the vertical play in the front wheels, I got a
spiffy new inspection sticker applied. I'm now legally able to drive
the beast on the road/sand/whatever's legal. I applied a finishing
coat of seam sealer on the panels behind the doors. I've noticed
an intermittent *tink* sound in the engine that sounds almost like
a screw being thrown against a valve cover, but the engine
stethoscope couldn't pinpoint the exact area of the noise when
it would occur. I'm going to need a radiator cap since the one
I have won't hold pressure. I also notice that the front
driveshaft doesn't go up very far into the font output from
the transfer case. I may get the shaft lengthened a couple of
inches before I take it somewhere offroad.
5/11/97:Muffler. My dad stoked me on a muffler and
tailpipe, and installed it for me. Parts were available from NAPA,
and I'll add them to the parts page when I get my hands on the
reciept. The "Brake" light in the center of the dash was terminally
lit, so I looked in the service manual and found that it is controlled
by a switch screwed into brake line block. It will only go out when
it is removed, allowing the plungers inside to reset themselves back
to center.
5/10/97:I really wanna take it home... but I haven't
got the time this day. I did some more sanding of the seam filler,
and got both sides ready for the final smooth coat. Pulled the
steering wheel and found the shunt I made hadn't been secure
enough and had come off. Re-soldered it and the hazard flashers
now flash as designed. The guages are working less than all the time,
so I took the dash panel back off to see if I can figure out where
the bad ground might be. Bolted the skid plate back onto the
tranny crossmember. Got the e-brake working with the proper
amount of stopping power.
5/9/97:Brakes, etc. Did some more adjusting on the
brakes, and managed to get them close to perfect. The e-brake
still doesn't grab like it should. Took it on a test run to check
the braking power, and found that if I was coasting and jabbed
the brake pedal hard a couple of times in rapid succession, the
motor would die. Apparently, the carb was flooding the engine.
This happened a couple of times (hey, it was a repeatable condition,
at least). Re-adjusted the new wiper arm to keep it from stopping
below the winshield gasket. Hazard flashers have stopped flashing the
lights even though I can hear the signal flasher doing its thing.
Turn signals still work, though.
5/3/97:Getting close, now! I sprayed undercoating
on the passenger side fuel tank, and installed it back into its
home and buttoned the panel back in place. Put the parking
brake cable and handle back on after I'd straightened it and lubed
it sufficiently, and it seems to work properly again. Put the rear
wheels on just to see what it looks like sitting on the ground
(pretty sharp, if I do sa so myself). Re-installed the vent
window assembly, and the teflon window channel trick works
*very* well. Put the trim peices back on the driver's door
and all is well with it. I sprayed the first coat of undercoating
on the exposed holes left in the old floorpan (I put new metal
over the existing pans). I'll need to get creative with the
accelerator pedal since the little ball attachment has broken
through the mount it was installed in originally. I'm thinking
of just putting some U-channel on the back to let the linkage
slide up and down in. If that isn't feasible, maybe a pedal
suspended by a spring will work (like in some later-model
vehicles). Installed a new wiper arm I bought from NAPA. I
had to use a puller to get the old serrated nut off the shaft
since the roll pin wasn't going to budge and only a few thousands
of the original pin were holding the nut in place. The new nut uses
two setscrews, so it didn't matter that the middle of the pin
wasn't removed.
4/30/97:Trim priming. Since I'd taken out the vent
window for the channel replacement, I decided to strip the
surface rust from the inside upper door lip. Primed it after that,
and sprayed the fuel tank with cold galvanizing primer to prevent
any more rusty buildup for the rest of its natural life (that's the
plan, at least).
4/29/97:Window channel. I still had some teflon sheet
left after I made the lower window channel insert for the driver's
door, and I need to come up with something for the front channel.
The original isn't available anymore, so I cut the teflon sheet into
a peice that I can attach to the front of the window. I folded it
over on itself and heated the crease to help it stay compact, Now,
I just have to put it in and test it out.
4/26/97:Floorpans. I began reconstructing the floorpan
on the driver's side to fix some major open spots. I used 18 guage
galvanized sheet and pop riveted sections in to make a ledge to hold
the new metal I'll drop in. I'm leaving what's left of the original
floor since it's still fairly strong. Removed the wiper arm from the
driver's side motor shaft. Couldn't get the serrated nut off, though.
Re-installed the driver's door rear window channel after I cut some
teflon sheet to make the runner that goes inside it. I still need
another layer to make keep the window from rattling when the door
closes. Removed the vent window assembly, and the window belt-strips
to see if I can find a match for them anywhere.
4/24/97:Just patch it. I was informed that Marine-Tex
makes a great patch putty for fuel tanks, so I bought some of the
grey kind, and applied it to the tank with the pinholes. It has hardened
nicely and looks like it'll hold fuel with no problems at all. Tough
stuff, it is.
4/22/97:Sender two -check. Pulled apart the other fuel
sending unit, and found that the cardboard resister retainer had torn
at the very top, so I twisted the output rod back into position and
straightened the wires as best as possible. Cleaned the wires and
straightened the contact and got it to read between 86 and 13 ohms,
which is close enough for me. Both tanks held the water I'd put in
them through the night with no sign of moisture at the bottom seams.
Gave the passenger side tank another wash and found even more stuff
coming out. I dried inside of each afterward with a blow-drier. A
friend may be able to tack on some new mounts to the driver's side
tank, so I'm crossing my fingers.
4/21/97:Fuel tank time. Wiped down the outside
of both tanks. Threw a handful of nuts and bolts into the
passenger tank and rattled them around for a while to loosen
as much rust as possible. then washed out the inside of each
with muriatic acid to remove the scale buildup. Took a wire
brush to the rusty spots on the outside. Filled each with a
few gallons of water to see if there was any seepage at the
seams.
4/19/97: Looking better. I installed the new tires
on the front end (Only two fit in my Integra comfortably), and
they look *sharp*! The 15x8" wheels and 31x10.5" Dunlops
fill the wheel wells nicely. Drained the rear diff since it was
leaking a tiny bit, sealed it with Permatex, and refilled it. The
passenger door lower hinge had gotten tweaked just a tad
somehwere in its life, so I put a screwdriver between the
hinge plates and applied some pressure. Now the door closes
as easily as when it was new. Brazed the bracket back onto
the window guide channel that goes inside the back of the
driver's side door. I need to see about replacing the plastic
insert before I put it back in the door. Began the patch process
by putting some new metal into the holes ahead of the rear wheels.
4/14/97:Sending unit - Check. Pulled the sending
unit out of the starboard side tank to see why it wouldn't read.
After a bunch of scraping and polishing of contacts, I got it to
operate to within 10% of nominal range. I can live with that.
4/13/97:Hazard a guess. After much poking with
a multimeter, and filing off the rivets holding the switch together,
I came across a combination that let the hazard lights work without
losing the ability to signal. I had to shunt between the pink wire
(pilot/unused) and the black wire to get power when the switch
was enabled. At least I didn't have to buy a new one. I put
Nev-R-Sieze on the steering wheel mount in case I ever have
to get it back off to replace it. After that, I saw I had no parking
lights or backup lights on the driver's side. This was found to be a
loose spade plug on circuit 115 coming from the steering column
harness. Now, the wires are tucked away and everything works.
Next, I cut some galvanized sheetmetal (Hampton SheetMetal)
into panels that would cover the outboard sides of
the fuel tank enclosures (about 9"x18" at the bottom) and
pop-riveted them into place. Then I sprayed both sides with
more rubber undercoat (I *refuse* to do more de-rusting in the
future). Got the front of the rear quarters ready to accept
panels of the same material. Filled the diffs with gear oil, so it's
ready for its first *real* drive.
4/12/97:And I *thought* I'd seen the last of the rust.
I took the wire brush to the inside of the cavites where
the fuel tanks are kept, and removed as much rust as possible.
I sprayed cold galvanizing primer on anything I cleaned, then
followed with a coat of rubberized spray undercoating. Removed
the steering wheel to take a look at the hazard switch which
still wasn't working. Couldn't get it working yet. Installed
the steering stabilizer.
4/09/97:To the junk yard. I found a tank for
the passenger side from Ivan Farley (717) 547-1482 for a
very good price. I then went to a local scrap yard and
found only a backup light from a postal Jeep that will
match the light that's on the driver's side. Cleaned it
and made a rubber gasket for it to replace the torn felt
unit in it.
4/08/97:Tank time. I made a run over to do
some work, and began the process of taking out the tanks.
I found and removed about twenty pounds of hard,
compacted dirt behind the fuel tank access panel and
the rocker panel. The driver's side tank mounts were
completely rusted away, and the fuel feed pipe was
rusted through. This is why I had the great Amoco flood:
the fuel pump started the suction and once started, the
siphon action continued through the rusted pieces of the
pipe, producing a lovely, lingering bouquet of processed
dinosaurs. The right side tank had thin spots that I was
able to poke through with a fingernail, thus the slow leaks
on it. After getting the tanks moving freely inside their
compartments, I ran into a block in that there isn't enough
room between the wheel well opening and the brake drum
to allow the tank to slide out. I'm planning on putting the
rear end higher, loosening the shackles, and letting the
axle down on a jack to get the clearance.
4/06/97:Cleaning day. Well, having moved
the beast from its winter home, I thoroughly cleaned the
garage floor, removing all traces of the surgery that
transpired over the winter. Cleaned the contacts on the
signal flaser and fuse and got the turn signals to work. I
think the contacts need to be cleaned on the hazard
switch since it still doesn't work at all.
4/05/97:Some finishing touches. Installed
the taillight and backup light, making sure to clean all
the contacts and grounds. Now, all the exterior lights
work on demand. Bolted in the instrument panel and
heater ducting. Tightened the fittings at the fuel tank
selector valve to fix a slow leak.
4/01/97:Gaskets. With all the scrap rubber
mat I've got left, I decided to make some new taillight
lens gaskets. I also made one for the passenger side
backup light. I soldered the buld to the socket of the
taillight on the side with the broken retaining "tang".
Hopefully, it'll work for me.
3/31/97:More re-assembly. Re-connected
the wires to the instrument panel, but there are still a
couple of bulbs that need to work a little brighter. I had
turn signals for a second, but they stopped working when
I tried to use the hazard switch. Re-connected the
ducting to the driver's side defroster vent. Attached the
tie rod to the steering knuckles, and then the drag link
to the tie rod. bled the master cylinder and brakes and
made the initial adjustments to each drum. Re-assembled
the locking hub that wouldn't fully lock down. Bolted the
font diff cover onto the pumpkin. All that's left
is to put the front wheels on and it can be driven.
3/29/97:It's all coming together. Got to it
early this Saturday. Got the rear brake shoes installed,
and put the rear drums on and bolted the wheels on for
the first time in more than several months. Installed the
ring carrier in the front diff. Note: I installed the bearing
caps in on the wrong sides at first, and it caused a tight
spot to happen. I put the caps back to their original locations
and the ring gear had the proper backlash. FYI, of course.
Installed the axle shafts and re-assembled the steering
knuckles. I used a moly greas in the knuckles since the
back of the knuckles weren't mirror smooth, and oil may
have leaked out (even thought the seals themselves were
new. Got the brakes put on and got the hubs installed.
I *did* notice that I must have not tightened a fitting on the
fuel tank selector valve since I see a drop constantly form
on the lowest point of the valve. I'll correct this the next
time I'm over there. Re-connected the loose vacuum line
that runs to the driver's wiper motor. I may also have a
*very* slow leak somewhere on the back outside corner
of the passenger fuel tank, but I can't see any concentration
of dampness except at the seam where the access panel
joins the inner body panel. Will it never end? :-)
3/25/97:More scrubbing. I also have the
heater ducting out and have taken a ScotchBrite pad
to it to get the surface rust removed from it. I did notice
a concentration of rust which makes me think there's a
leak near the wiper motor on the passenger side, so I'll
check it the next time I'm over working on it. Cleaned
and re-greased the rear sections of the parking brake
cable.
3/24/97:Polishing chrome. Since I have the
instrument panel removed, I'm taking the opportunity to
remove the surface rust from the chrome of the guage bezels,
A simple SOS pad knocked it right off and they look brand
new now. The turn signal lever needs a bit more attention,
and it'll need some paint since the rust was a little thicker
on it.
3/23/97:Front end's turn. AFter more cleaning of
the inside of the pumpkin, I installed the pinion into
the front axle, and discovered two more seals that aren't listed
in the manual (stamped 17036). I'll have to get these before
I can put the ring carrier back into it. These are outboard of
the ring carrier bearing races on each side. Re-installed the
driveshafts front and rear.
3/22/97:Rear-end closed. Bolted the diff cover
onto the housing and re-attached the brake lines. The part
number in my manual listed the wrong size shoes, so I have
to exchange them before I can install the brakes and rear
wheels. Removed the instrument panel to check the oil
pressure and fuel gauages. Both work normally when voltage
is applied, so I'll have to hunt the problem down with a circuit
trace.
3/17/97:Rear end ready. After a few more attempts
at getting the pinions bearing preload correct, we finally get the
pinion, seal, and yoke installed into the pumpkin. As an aside, after
measuring the preload shims twice, we still had to add more to
the original thickness to get the tension right (just FYI). If I ever
build another diff after the front one, it'll be *much* too soon.
Installed the ring carrier and, fortunately, the original shims
gave the proper amount of backlash. Got the rear
axles/bearings installed and mounted the backing plates onto
the axle tubes.
3/16/97:Diff stuff. I took the opportunity to
fill the transfer case with oil (through the vent hole since the
access panel was still off). I installed the pinion races with
the sppropriate shims. The yoke had rusted away at part of
the lip that the seal rides on. My dad brazed it all around and
milled it down, but it took a while to get the excess/flux out of
the splines. BTW, the front yoke is about .250" longer than
the rear. We reasoned ourselves into putting the shims for the
bearing preload on the wrong side of the front bearing and it
took us over an hour to get it back out. A much closer look
at the service manual showed where the shims should have gone,
so I'll attack it again Monday. Installed the flywheel
shroud/cover.
3/15/97:It..... LIVES!!! It turns out that there is
a hose that's made and is in the parts books, so a different
NAPA found the right model. It was put on and the clamps
tightened. Filled it with water and a touch of anti-freeze
(since I'm going to drain it to remove all the gunk that didn't
get blown out). I put the old header pipe on without the
doughnut since the original wasn't the right one. I'm going to
have a shop bend a new system for me anyway. After tweaking
with the distributor to get the timing close, it finally stayed running
without any help. My dad timed it by ear and it purrs like a kitten
(albeit an unmuffled kitten when the revs go up). We weren't
showing any oil pressure on the guage, so we put a manual
guage on it and it read exactly within specs (15 @ idle, 45 @ 1800).
It starts the first time every time! The only guage that doesn't
show a good reading is the dreaded fuel guage, but I figured
on that not working anyway. I also adjusted the clutch linkage
and found that a roll pin had sheared (that's why
the old rod seemed too short and was bent). Even the wipers work,
but there's a small leak on the driver's side motor/vacuum hose.
Plenty of heat from the heater/defroster, too!
3/04/97:I have a hose (almost)! My dad tried to fab a
90 degree bend into aluminum pipe, but there was just barely too
much clearance if we were to cut it to the right length to fit.
It would appear that I'll need to get one from one of the used
parts vendors. Torqued the oil pan bolts, put on the oil filter,
and filled it with oil. Replace the fuel filter element. Installed
a horn and tested it.
3/01/97:More little parts on. Found a piece of grade-7
threaded rod to use in place of the current clutch pedal pushrod
(it's bent). Installed the top radiator hose, but the flex hose
I got for the bottom wouldn't work (again). Wiggled some wires
and now have high and low beams on both headlights, and dash
lights. Dissected the passenger taillight and found a broken
socket with no bulb installed. Passenger reverse light still
wouldn't work using bulb from the other light. The license plate
light also worked when the good bulb was put in. Cleaned and
aligned the points contact and installed a new condenser in the
distributor.
2/23/97:Plumbing hookup. Installed new heater hose
(5/8" - one six foot package was enough). Installed radiator and
fan. The radiator hoses were each about two inches too short,
so I'll need to try again on those. Connected new vacuum lines
(7/32" ID), and PCV tube. Removed the "finger" seals (part of
the rear main seal) by screwing in a drill bit and pulling,
and then pushed the new seals into place using an aluminum welding
rod. I used some sealer between the gasket and the oil pan after
taking a wire brush to the pan, and bolted it into place. The rod
that runs from the clutch pedal through the firewall had a notch
worn into it and is bent at that notch, so I need to find a piece
of fine threaded grade-8 rod that's about 3 inches longer than the
current one. I hooked up the battery (careful, the red lead is
ground), and the radio came to life. I have two front parking
lights, a driver's side rear parking light and backup light, and
a passenger side high beam. The only dash light that works is
the high-beam indicator. No turn signals. It's better than
nothing.
2/19/97:Vacuum routing. I got word from the IHC digest
about how the vacuum tubes are supposed to go. The "Y" shouldn't
even be there and the "Out" from the fuel pump should run to the
fitting on the intake manifold. I also glued the rubber strips
I'd cut onto the transmission tunnel panel, so it's ready to be
put back in when I get the driveshafts re-attached.
2/17/97:More engine work. Bolted on the alternator
bracket and alternator and installed the new fan belt. Installed
the new vacuum advance module and set the points gap in the
distributor (cleaning the plug wires/connectors afterward). New
spark plugs are in. De-rusted/primed the rearward interior
section where the transmission tunnel mates to it. Re-connected
most of the pipes and hoses to the carb/fuel pump. My manual
didn't have a picture of the vacuum hose routing, so I need to
experiment a bit since there was a "Y" adapter put in by the
last owner that doesn't look like it mates to anything. I need
to re-connect the fuel line to the pump since it became
disconnected when the engine "dropped" on us a couple of weekends
ago. Re-installed the starter motor (another feat of wrenching
in a *very* cramped area). Installed the freshly painted valve
cover. It's really exciting to actually see the motor nearly
complete again (plus, everyhting's been painted IH red instead of
30 year old rust).
2/15/97:Re-assembly continues. My friend Chuck didn't
wise up after the first time, so I managed to get him to help
again. We bolted on the "new" bellhousing and then we got the
tranny/x-fer case bolted back into place and re-attached
the shift levers. Installed the new urethane motor mounts (no
small task) so we could put the engin back together.
Re-installed the cylinder head, exhaust manifold, intake
manifold, clutch linkage, carb, and water pipe (making sure to
torque everything to proper specs) by the time we'd decided
to call it a day.
2/13/97:"It" has arrived. After two weeks of
thumb-twiddling, the bellhousing arrived on my doorstep last
night! I immediately headed to the workbench to take a wire
brush in a drill to clean off the buildup of hardened
mud/grease. A little more cleaning, and I'll be able to put
some paint on it. The unit is in very good condition (other
than needing the cleaning), and AT Scouts was *very* helpful -
I highly recommend them.
2/11/97:Yet more de-rusting. Cleaned off all the rust
from the exhaust header pipe and painted it with high-temp BBQ
grill paint to stave off the rust for a little while. Found a
spare header doughnut behind the driver's seat that I'll be able
to put to good use. Went by Off-Road Performance and found a few
extra differential shims they had lying around and I took my
calipers to the old shim packs (heavily rusted where the water
was leaking out of the diffs and managed to put together enough
in the right thicknesses. Now, I just have to put them in the
diffs so I can start on the brakes.
2/8/97:Flywheel install. Installed the new rear main seal.
Installed the pliot bearing into the flywheel, and put the flywheel
back onto the crankshaft. Then, put on the new clutch disk and
pressure plate assembly. The previous owner had replaced the tranny, so
I had the old input shaft to use as my alignment tool. Do not attempt
to replace the clutch stuff without something to align the parts! It
could take forever, although it'd be doable. Also cleaned the rear
axle tube which was still a little too grungy. Now, all the gunk
that isn't firmly attached is cleaned out. I have to find some shims
for the pinion bearing race and I'll be able to re-assemble it. I
took out the parking brake cable since it wasn't working freely and
found out that there was a major kink and fraying right before where
the cable exits the cab. Now, I've got to find one of those, too.
Got the first coat of paint sprayed on the axles and leaf springs.
2/4/97:More painting. Painted the skid plate and flywheel
cover.
2/3/97:More priming. Primed the transmission tunnel, tranny
skid plate, and flywheel cover. Cleaned the shifter boots.
2/2/97:More cleaning. Cleaned the crud from the tranny
skid plate and flywheel cover and took a wire brush to the couple
of spots that has some surface rust.
2/1/97:Installed... Put the new tranny mounts in
place of the old ones. Now the tranny/x-fer case sit about half an
inch higher than before (the bump stops don't even touch like they
used to). I hope this is not bad. Installed the fuel tank selector
valve. Had to drill two new mounting holes for it since this valve's
outlets point in the opposite direction of the original's. I would go with
the Weatherhead 4-way and plug the center side outlet to get a valve
that's as close to original as possible if I could do it over. I do like the
fact that the 3-way's outlet exits the side instead of exiting down as
before. Stripped and primed the axles, springs, and shackles. Installed
shallow-disc freeze plugs (1-3/4") in the front and rear of the block and
painted them to help prevent future rust-out.
1/29/97:Motor Mounts. Received the motor mounts and
tranny mounts I'd ordered from the local Navistar dealer. These are the
polyurethane type instead of the rubber which was original
equipment. They appear to be slightly thicker than stock. I hope the
clearances won't be affected too drastically. Went to the store to replace
the bolts with grade 8 versions.
1/27/97:Gasket material. The rubber gasket/strip that
runs along the bottom edge of the transmission tunnel cover needed to be
replaced, so I went to Hampton Rubber and picked up some sheet of
the right thickness (free since the guy said it was just scraps), and
also got some thicker stock to make the dust shields used on the drag
link to replace the worn-out felt original equipment. There was plenty
of the sheet left over should other things crop up needing the same
material.
1/23/97:More painting. Finished painting the
transmission shift lever, both levers for the transfer case, and the boot
hold-down rings for said levers. Cleaned up the threads a bit where the
pressure plate is bolted to the flywheel since the old bolts came out with
less-than-sharp threads on them. Also, got grade-8 bolts (6) to replace
the grade-5 bolts (3) that had been used. I've no idea where they
found the pressure plate that was in it, but the new one will now be held
down using all six available holes in the flywheel.
1/21/97:More cleaning. Since I've got the transmission
tunnel cover off, I figured I'd de-rust the major spots and put
some primer on them to slow the growth of the iron lace. I'm still
planning on Rhino-Lining it as the last step in the restoration, so I'm not
too worried about the primed appearance, just the rust. De-gunked
the transfer case shift levers and transmission shifter and gave
them the first coat of new paint. Picked up the clutch, pressure
plate, pilot bearing, and throwout bearing (the bearing was astronomically
priced, FYI). Wire brushed the flywheel and checked to make sure the new
pressure plate would work (the old one used only 3 bolts to hold it on, the
new uses all 6). Rayloc is the manufacturer of both, and we used the
part numbers designed for the 196 engine.
1/20/97:Major bummer. I decided I'd clean the outside of
the transmission and transfer case since it would be easiest at
this time. They cleaned up beautifully (I can even see the "Dana" logo,
now). While cleaning off the bellhousing, I noticed some major
cracks at the bottom corners on each side. I think it's due to the rear
transfer case insulator/mount needing to be replaced. I'll order new mounts
all the way around, now. Wire-brushed and primed the floorpan area
where the fuel tank valve will be going back in. The flywheel will also get
the wire brush treatment, but it doesn't need to be turned. The pilot
bearing came out easily by tapping on it with an appropriately sized
socket. I found that the hole in the front of the transmission case where
the cluster gear shaft is inserted is weeping oil a bit. So, we'll dry
that off and silicone it before mounting it back on a new bellhousing.
1/18/97:Time to check the tranny. Enlisted the help of
my friend Chuck ('71 Bronco) to aid in dropping the tranny/xfer case
so I could replace the last of the infernal freeze plugs. The fluid
that we drained from them was still fresh looking, so for once I won't
have any bearings to replace! We got the clutch pack off the flywheel
with a little trouble since the pressure plate expanded as the bolts
were loosened. We has started on the flywheel bolts when it became
obvious we'd forgotten to brace the back end of the engine. One of the
motor mount bolts gave out and we were quickly holding the back end with
our hands until I could get the jack under it. We couldn't get to the
plug in question since the bellhousing was in the way, so we began
removing the it as well. The freeze plug is a 1 3/4" unit, FYI.
The clutch disk is oil-soaked, so a new disk/pressure plate have been
ordered.
1/16/97:More parts. Got a call from my NAPA source, and
the long awaited rear ring carrier bearings are finally in. He's
getting another friend to press them all on for me. He also bench-tested
the alternator and it puts out what it's supposed to. Painted the oil
dipstick tube since it's already removed from the block.
1/11/97:Piecing it together. Put the neoprene core plugs
in the side of the block (used 1.5" since the old metal plugs had
fused into the ~1-5/8" original holes). Blew out all the rust/scale with
a compressor (wear a dust mask!). Found the one at the front also
needed replacing. Had to remove the dipstick tube, which required
bending the oil-fill tube mounting bracket a bit to remove it. Got the old
plug out completely, so the 1-5/8" neoprene plug worked. Had to file
down the center tightening bolt so the dipstick tube would fit back in.
There is also a plug at the back of the block behind the
flywheel, so I'm crossing my fingers that they're still solid. I can see
myself pulling the flywheel to check them, though. Waiting on the intake
manifold gasket and I'll put the engine back together and start it.
1/9/97:Painting. Stripped and painted the alternator
bracket parts and the exhaust header. I used BBQ grill paint on
the header in hopes that it might last a while in regards to the heat.
1/8/97:Header removal. Used one of the Craftsman
"robo-socket" type wrenches to grip the bolt heads and got the three
remaining bolts out. Finished de-gunking the surfaces of the head and
also removed all the varnish/etc. from the rocker arm assembly. Amazingly,
the cleaned up parts look great now! I did notice some wear on the rod
that the rocker arms ride on, but if I changed that, I'd have to re-set the
valves in case there were different tolerances between old and new.
Maybe next time...
1/7/97:Head Cleaning (cont). Finished cleaning the top
surfaces including the outside areas of the valve springs. I don't
have a spring compression tool, so I'm not going to try to remove
them for cleaning. Got the old freeze plugs out from the back of the
head. Also finished cleaning the ends and sides. The exhaust manifold
side will have to wait until I can get the bolts off.
1/6/97:Head cleaning. Began the process of getting the
gunk off the surfaces, etc. Some of the goop was hardened, so I got a
jeweler's flat-blade screwdriver to remove the sludge down to the
metal. Couldn't finish it all at this time, but got the top-tappet side
done.
1/5/97:Head inspection. I had planned to take the head
into a local speed shop to get them to clean it, but it looks like I'll
be able to take a brass bristle brush to it to de-gunk it. Had to cut
the smog air-injection feeder pipes from the compression fittings to
remove the fittings. I hacksawed the tubes so I could still use the setup
in the future if needed. I'll use some worm-type set screws to plug
the holes. The next problem will be to remove the exhaust header. The
two end bolts are 9/16" and loosened nicely. The three middle ones are
between a 1/2" and 9/16" (and between 13mm and 14mm). I want to
remove them and replace them with grade 8 allen-key bolts, and also so I
can replace the manifold gasket.
1/4/97:Engine wrenching. I began the day trying to fit
the 1-5/8" rubber expansion freeze plugs into the block, but I think I
need to try the 1-1/2" size to save myself a bunch of filing to
make the current holes bigger. Installed the rebuilt/repainted water
pump. Re-installed the clutch linkage. Had to pull the head since one of
the freeze plugs at the back was too deteriorated. There are two back
there, so I'll put rubber plugs into each and not have to worry
about them again. There's also one on the front, but it looks fairly
new, so I'm leaving it for now. I had no idea how heavy a cylinder head
was until now! (and I thought the *intake manifold* was hefty!)
1/2/97:Little stuff. I'm having trouble finding some of
the parts for the front axle. Mainly the rubber oil seal ring and the
felt dust shield ring that scrape the back of the steering knuckles.
I went to Hampton Rubber and had them cut some rings from matching
stock (5.5" OD x 4.5" ID) for $10. Then I went to a Piece Goods
fabric store for the felt since none of the auto places seemed to have
any. Picked up a yard for less than $2 and cut the pieces using a
cardboard template I made from the remains of the original (later found
that Navistar have the original equipment and chucked my home-made
ones). Cleaned the connectors on the main coil, and painted it and the
clutch linkage.
1/1/97:Water pump rebuild. Generous applications of heat
from a torch were required to remove the screws holding the pulley
cluster onto the pump. Beyond that, it was a cakewalk to remove
the pump from the housing. It's in the painting stage right now, as
are all the parts associated with the pump.
12/28/96:Block Freeze plugs. Since I'd removed the
exhaust system up to the manifold, it was easy to get to the freeze plugs
on the side of the block. Upon poking around, I found another behind
the starter, so I had to remove that as well so that I could dig the
third plug out. I had planned to use metal cups like the original, but
there is too much deformation from rust to make a reliably round hole of
the right diameter. I'm switching to the rubber expansion plug type
instead since I won't have to do as much work for the same sealing effect.
Installed the master cylinder. Removed the fuel tank selector
valve since the knob had been broken off years ago. Hopefully I'll find
a replacement at the local NAPA store.
12/16/96:Manifold Freeze plugs. Installed the two freeze
plugs in the side of the intake manifold to replace the ones that
had rusted away. Used RTV sealant (non-hardening) and just beat them
in with a hammer. No drama there. Also cleaned up the hub parts sent
to me by Kent Grasso (thanks again, Kent) since parts of mine were
unusable. The Warn hubs I was sent are identical to the original
equipment with the exception that the locking knob has the "IH"
logo in the place of "Warn". Now I've got workable spare parts!
12/13/96:Drums turned. Took all four to Auto Pro (local
garage) and they turned them for $8/ea.
12/09/96: Diff bearings. Dropped off the ring carriers
and pinions to have the old bearings removed and the new ones pressed
into place.
12/07/96: Time for finish coats. Got the diff covers,
tie-rod, and drag link completely painted and ready. First coat on
the driveshaft yokes. The rear yoke needs attention since it has
a 1/2" piece that's rusted away and left a valley where I believe the
oil seal will ride.
12/03/96:Yet more painting. Wet sanded the rear diff
cover to remove the orange peel look achieved from the rust pits in the
metal. Put the second coat of paint on and it's looking like I
wanted it to finally. Got the front painted with its first coat also.
Cleaned out the sockets at each end of the drag link and found that
one of the tension springs is broken. I'll wet sand it later and
give it another shot of paint, too.
12/02/96:A bit of painting. The rear drums are cleaned
and painted with the same paint as used on the fronts. If nothing
else, they look tons better than they did in the basic rust color. It
appears that the rear hub and drum were once two separate pieces,
but were welded somewhere along the way. The front has no discernable
seam and no amount of pounding and heating did any good with regard
to separating the two. Got most of the rust from the diff covers
and got the first coat of paint on the rear cover.
12/01/96:Check on the parts order status. A friend of
mine manages one of the local NAPA stores, and has agreed to help me
track down the various parts I'll be needing. I gave a list of the part
numbers out of the parts catalogue I got from
Binder Books and
he's entering them as he finds time. By all means, buy the parts manual
for your vehicle as well as the service manual (if you plan to work
on it yourself)! I think Giddem Up Scout had a better price on the
manuals but I don't know if they are the same as the reprints from
the originals that I got from Binder Books. Fortunately, most of
the stuff I need will be able to be gotten from NAPA. Here's a list of
Scout parts
suppliers , should you need any hard to find goodies.
11/24/96:Yet more stripping. De-gunked the tie rod and
drag link, and painted them gloss black (the color for everything
I'll end up painting). Painted the backing plates, steering knuckles,
front hubs, both driveshafts, and kingpin blocks. The front drums got a
coat of BBQ grill paint to help reduce the rust factor on them. I still
need to clean up the rear drums.
11/23/96:Nearing the end of cleanup. Did some more
scrubbing on the insides of the diffs to make sure the fluid would
flow through the proper passageways. Man! This stuff still
stinks, even after airing out for 3 weeks! Pulled the master cylinder off
so that it can be replaced. The brake lines look good so far, but
we'll see how they do with the new hardware installed. Pulled the drag
link off and separated it from the tie rod.
11/21/96:More rust removal. Stripped the steering
knuckles, wheel spindles, and kingpin blocks. Also got the brake parts for
the front wheels as shiny as possible (definitely not mirror-like). I
think I'll replace all the bolts that hold the knuckles together
since that will be easier than trying to de- rust them. Also the bolts
holding the kingpins blocks to the knuckles were pretty rusted, so I'll
invest in some replacement grade-8 bolts and lock washers for them.
11/17/96:Rust removal. Got a wire brush on my drill and
attacked the front drums and hubs. Get them all primed with the
same primer. Also painted the backing plates. It's nice to see some of
the end result to all the cleaning finally.
11/16/96:Pinion removal. We got the yokes off each pinion
and beat them out successfully. Each cleaned up nicely, and now I can
get the bearings pressed on them at the same time I get ones pressed
onto the ring carriers. Cleaned the sludge out of the rear pumpkin.
Also got the races out of each diff, and also out of the front hubs.
11/14/96: Primed backing plates. I used a cold galvanizing
primer to hopefully reduce the amount of rust that will eventually
happen. So far, so good.
11/11,12/96: Backing plate cleanup. Now that the gunk
had been removed from all four plates, I put a wire brush on my drill
and proceeded to chop through all the rust built up over the years.
Most of it is off, but there are still some nooks and crannies that
need some attention. Wheel cylinders will be necessary at each
corner.
11/10/96: More Front end disassembly. Pulled the front
axles from the housing and with a pry-bar, removed the ring
carrier. There isn't as much surface rust as with the rear end internals,
so cleanup went surprisingly faster. As with the rear, new bearings
will be required. I'll need to take both to a shop that can
remove/press the bearings back on for me.
11/09/96: Front end disassembly. Yanked the front brake
components off, Thank heaven for the trusty impact wrench with a
universal socket. Without them, I'd have never gotten the
retaining plates off the back of the steering knuckles. Pulled the backing
plate for the fronts as well as the knuckles. They cleaned up
nicely on the inside, but the outside will need to be wire brushed
like the backing plates before I can prime/paint them.
11/07/96: More cleaning. Put the rear backing plates
into the cleaner and got most of the crud scraped off them. Now they're
ready to be stripped of the rust/paint and be primed and painted.
11/05/96: Brake parts cleaning. Having pulled all the
brake hardware off the rear backing plates, I proceeded to clean
them with a wire brush and "purple de-greaser" *NOTE* : wear rubber
gloves when working with the purple stuff -- my hands are still peeling
four days later.
11/03/96: Rear end disassembly. Having gotten the rear
drums off, I pulled all the brake components off and removed the
backing plates so I could clean it all up. Axle bearings are a
taper fit and were easily tapped off with a brass punch. Pulled
the carrier out, took off the ring and the spider gears and cleaned
most of the rust and grunge off them all. All bearings/seals need
replacement.
10/27/96: Pulled the oil pan. After cleaning all the
sludge baked onto the inside of the pan, I looked up into the cylinders
and they appear to be in great condition. I scraped the grime off the
surfaces under the tappet cover and cleaned it and the valve
cover. Turning the engine over with a socket on the crank pulley
showed that all the lifters were doing their jobs, so I'm not going
to pull the engine after all. Also cracked open the front diff to
find that water had condensed in it like it had the rear. It
doesn't look as badly rusted as the rear did, so I'm a little more
relieved that I won't have to work on it as much.
10/24/96: Finished cleaning the locking hubs. After
scrubbing with ScotchBright pads, the hardened gunk came off,
mostly, then on to the Dremel tool to do the polishing that was
left over. The Axle Shaft Hub on each will need to be replaced since
all the chrome on the race was pitted.
10/23/96: Managed to get the rear brake drums off. The
tool for this has three hooks that attach to the wheel lugs connected
to a forged-looking ring with a screw in the center. After more heat
and banging, they yielded and came off. Mental note: Use plenty
of Never-Seize when re-installing.
10/19/96: Tried to get the rear brake drums off. I
rented a rear drum puller (a bar-looking piece with a hook at each end),
and proceeded to frustrate myself to no end. After heating the
drum and trying to help the puller with a hammer, I saw that they
weren't going to budge that way. Pulled the front hubs off and got
the front drums off (no problems).
10/14/96: Pulled off more engine components including
carb, intake manifold, water pump, water neck, etc. Major rust in
the water jacket passage-ways. Bead blasting should take care of
the majority of it. Pulled the exhaust system off to get it out of
the way.
10/12/96: The rear wheels come off to start to work on
the rear diff, but the brake drums are too stubborn to come off with the
tools we have at hand., so I yanked the shocks off while it was up there.
Pulled rear shocks off and they oozed fluid as their last "hurrah".
More bad news: the diff appears to have water as well as oil in it evident
by a drip of rusty water coming from the pinion bearing. I leave it for
now until we can get the brake drums off. I move to the
motor next and yank off the smog pump (I'm going to put an A/C
compressor in it's place for on-board air when the rest of the engine is
working). I find the first of the bad freeze plugs on the back-driver's side
of the intake manifold. The second is found just barely weeping on the
exhaust manifold side of the engine . When I finally get the service
manuals from Binder Books (It's been over a week since they sent
them and still nothing), I'll scan for all the plugs on the engine to
check any that may be hiding from me. Take distributor cap apart
and find that the vacuum advance had broken its mount from the
side of the rotor housing. More de-greasing of the spots the
pressure washer missed. Brake fluid is non-existent in the
front chamber and only 1/3 full in the rear chamber. No wonder the
brakes didn't work (well, that's probably only the beginning of *that*
saga). I can see I'll probably need to bend a lot of tubing in the near
future. 10/5/96: The first thing I did was to get it off the
trailer. Hooking the tractor to it, we pulled it forward and the pinion
finally freed itself as the rear wheels met the ramps leading off the
trailer. At least we could now move the thing.
The obligatory pictures were snapped for posterity and I began the
scrubbing process. In all its years, I think it never had a bath in the
engine compartment. An hour later with a pressure washer and de-greaser,
and I could actually see a resemblance on the firewall to the Apache Gold
(blech) color of the rest of the truck. At least I could now see where to start
attacking the thing.
Installed the rubber seals to the drag link and greased them up.
Bolted on the front wheels. Drained the right side tank (it
seeps near the bottom seam), and put the gas into the
driver's side tank. Surprise: the guage reads correctly!
Replaced the tranny access panel and started it while
still on the jackstands to make sure there wasn't a bind
anywhere. Engaged the transfer case and all the wheels
worked when desired and stopped when I mashed the brake.
I turned the motor off and heard a liquid cascading beneath
me. Looking down, I see gas almost pouring out of the
floorpan beneath the tank. Some hectic moments getting
some storage containers and catching it, followed by about
an hour cleaning the place, and we put the truck on the ground
and started it with some gas put into the right tank again.
I backed it out under its own power, which was a great feeling!
I let it idle in 1st over to my dad's shed where it will remain
until I can get the tanks straightened out.
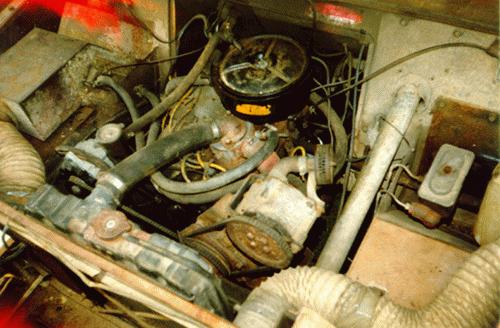